The Griffin Head


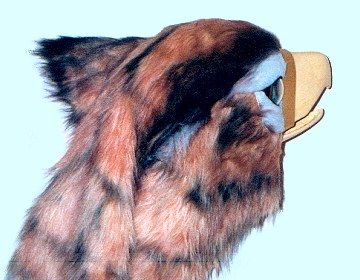
After  the beak is attached, the real work of creating the griffin head begins.  The first step is to sculpt the shape of the helmet by adding a couple of inches of lightweight foam and carving it into the desired shape.  I used a type of open cell foam called Reticulated Polyfoam.  It has the excellent property that air passes right through it.   I got enough for two heads for $20, from Bob's Foam Factory in Fremont, CA.

The foam is glued to the helmet with Elmer's "new formula" Neoprene Based Contact Cement.  This is the best cement I've ever worked with.  It's strong, has a long setup time before joining, and has very little odor.  The only thing about it that isn't perfect is the color, which is an interesting shade of turquoise.

The next picture shows the head with the foam in place.  An electric carving knife is ideal for cutting it.

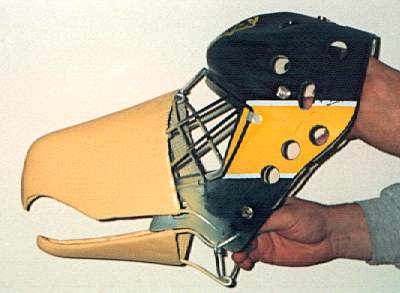
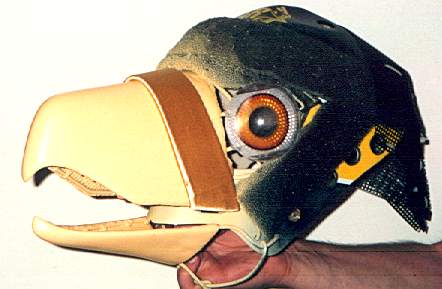
The assembled eyes are secured to the wire cage with white plastic tie-wraps.  A bit of shiny material wrapped around a piece of plastic mesh and glued to the beak adds further definition.  Finally, a cowl of black plastic mesh in the back gives support to the fur "mane" that will drape down the back of the neck.

head11.jpg (16669 bytes)
head15.jpg (20241 bytes)


GrifRug1.jpg (26377 bytes) The next step is to glue the fabric onto the helmet.  In the left picture, the fabric has been cut to fit around the beak and eyes.  It may be stretchy, but a few more small cuts will still be needed to make it fold around the curved head.  I took my time and made sure it fit before I attached it.   Contact cement is unforgiving -- the first touch is the last.

When the tawny fur is on, the white fur around the eyes can be added.  The shape of these pieces is very important, since they define the gaze and expression.  I re-cut them four times before I was ready to glue them on.

The right pictures show the results.  Suddenly all the careful measuring and planning comes into focus, and the head starts to look like a living creature for the first time.

Head21.jpg (22874 bytes)
Head32.jpg (23844 bytes)


head41.jpg (35123 bytes)
head42.jpg (23648 bytes)
head43.jpg (30265 bytes)
The ears are a "fur sandwich" made of a triangular piece of plastic mesh covered with a piece of white fur and a piece of tawny fur, glued together with Scotch 77.  When dry, the triangle is folded and creased to give it its three dimensional shape.  Then the ears are attached to the head with three plastic tie wraps each -- one at each tip and one at the back.

Finally, the fur is airbrushed with transparent dye to give it its distinctive look.  The eyes and beak are covered with masking tape for this step.  I used a Badger Model 200 airbrush, which is the cheapest I would recommend.  The dye I used is Rotring transparent acrylic paint (German for "red ring", pronounced with a long "o").  It works wonderfully on acrylic fur.  It's waterproof and completely lightfast, and doesn't glue the fur together.  You can find it in art stores for about $5 an ounce.

The painting is done in four layers.  First the deep layer is applied.  The fur is brushed backwards and fluffed up evenly, and the orange-brown tiger color is airbrushed straight down into it (or as near as the airbrush will allow) to color the entire fur and fabric.  I made this layer somewhat uneven so that different parts of the fur would have slightly different colors.

The second layer is a dark true brown color, to add shadows in the places where there should be hollows under the bone structure, if it had a skull inside it.  The effects are hard to see since the eye just takes it in stride, but look carefully along the side of the neck where I darkened it to add the shadow under the jaw.

The fur is now brushed smooth for the third layer.  Solid black dye is applied above the eyebrows and along the tips of the ears at close range, airbrushing in the direction of the nap so that it lays smooth.  This causes only the tip of the fur to be colored, giving it a natural brindled look.

Finally, the tiger stripes are added by finger-brushing the fur in random directions, then airbrushing smooth curves into it.  When it's combed smooth again, the stripes look shaggy.